Creating a Simple Python GUI with Tkinter — Tips for Beginners
pythonguitkinter
In the last blog, I examined using ElementTree to navigate and modify XMLs and included a working example that leveraged it to overcome shortcomings on lower end smartwatches. Now, I will using explore creating a graphical user interface using Tkinter, liberating it from dependence on the command line.

To the programming neophyte, the notion of what goes into creating a graphical user interface can seem like an intimidating dark web of complexity. The thought can easily become overwhelming; remaining fixated on the low level “magic” and wondering “how the heck is someone supposed to turn all of those obtuse commands into a work of visual cohesion anyway?”
With the right libraries, creating a GUI really isn’t all that bad. When combined with some good foundations in object oriented programming and a bit of planning, you can be well on your way bringing to your code to life.
Introducing Tkinter
To rescue my hard work from command-line-obscurity, into just plain old obscurity-obscurity, I used Tkinter which is included in Python’s standard library. There are many other ways to build a Python-based GUI front end (each with their own trade-offs), but if you are a beginner, Tkinter will be a solid choice that can offer a good learning experience because:
- It is cross platform and your code will easily run on Linux, Windows, and Mac OS X.
- It is included in Python’s standard library.
- Tkinter (and the underlying Tk) is mature and long established with a lot of online help documentation available.
However it is important to note that there is a small price for this simplicity:
- In order for any system to be able to run your program out of the box, Python must be installed on it. This is also true for the GUI-less code you have already been creating. However, the intent to add on a GUI comes with an implicit targeting to a less technically inclined audience. On top of that, packaging the additional dependencies into a standalone installer will be harder to do than a simple command line app. If you want to present an easy install across multiple platforms, other GUI libraries will come with less resistance.
The basics of the layout
To begin we’ll create a simple button. To better illustrate the flow, this example does not make use of custom functions and classes. However, building out an entire GUI in this fashion would quickly become unwieldy.
# Imports the Tkinter libraries.
from tkinter import Tk, ttk

# Instantiates the Tk class, which will be the top level item where all graphical components are stored.
root = Tk()

# Creates a simple button that does nothing when pushed, adding it to the root object.
button = ttk.Button(root, text = "This is a placebo that makes a pushy animation")

# Places the button in the window.
button.pack()

#Initializes the GUI
root.mainloop()
Notice how the code contained a command with the word “pack”. What that does is invoke a “geometry manager”. Tkinter includes three choices to give maximum flexibility in controlling your layout. Pack is the quickest one to use for simple tasks since it just stacks items up/down or left/right, but more complex layouts can benefit from the use of grid and place.
Now before going wild making buttons left and right, plan accordingly because if you try to mix and match geometry managers you will run into problems! When necessary, it will help to leverage frames to establish clear divisions to make the reach of geometry managers self contained into nested hierarchies.
Of course aside from just plain old buttons, you can create so much more. With additional elements including textboxes, dropdowns, and progress bars, you can easily add many layers of functionality in a manageable way. But first you have to define how they interact with user input.
Configuring button events
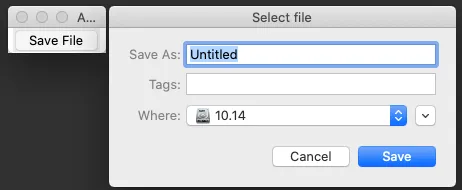
The trick to making your UI respond to interaction is with event handling. If planned well with with a good object-oriented design, mapping out the desired behavior will be much easier than just winging it. Below is a basic example of how you can call a simple prompt to save a file.
# Imports the Tkinter libraries.
from tkinter import Tk, ttk, filedialog

class GUI(object):
    def __init__(self, master):
        self.master = master
        master.title("A test GUI")

        # A button like the example before, except this one contains the
        # "command" argument
        self.save_button = ttk.Button(self.master, text="Save File", command=self._save_dialogue)

        # Specifies the buttons placement using the pack geometry manager.
        self.save_button.pack()

    # Captures a filepath using Tkinter's built in file browser.
    def _save_dialogue(self):
        filepath = filedialog.asksaveasfilename(
                                                initialdir = ".",
                                                title = "Select file",
                                                filetypes = (("jpg files","*.jpg"),("all files","*.*"))
                                                )
        self.filepath = filepath

root = Tk()
example = GUI(root)

#Initializes the GUI
root.mainloop()
In addition to calling functions, buttons can also store values into variables. However, keep in mind that doing this requires the variable to be constructed from one of four special classes in the Tkinter library. Referencing the raw values will just result in your button not working as expected.
- StringVar — when the button needs to output a string of text.
- BooleanVar— stores either 0 for false or 1 for true.
- IntVar — used for integers.
- DoubleVar — corresponds to floats.
Moreover, upon assigning a variable from one of these classes, it will reference an instantiated object that contains the value, not the value itself. You will need to access it via its .get() method.
Modifying the style
Now after learning a few basics, at this point, you may be wondering why all of your new buttons look trapped in the 90s. They don’t have to be. You can access attributes of each element customizing them as you see fit.
To begin, it helps to see a list of font families that are available. Without a correct match, any changes to the font style will not work.
# Imports the Tkinter libraries.
from tkinter import Tk, ttk
import tkinter.font as font

# Instantiates a TK object with a single button. This one will not be
# displayed as it doesn't call a geometry manager.
root = Tk()
button = ttk.Button(root, text = "Another ordinary button")

# Returns a list of supported fonts by Tkinter.
print(font.families())

# This command lets us know what style an element uses.
print(button.winfo_class())
This code block also contained a method that reveals the currently used style for an object in the last line. In the case of a button, it prints the text “TButton.”
Customized styles can easily be created and applied to elements in your GUI.
# Imports the Tkinter libraries.
from tkinter import Tk, ttk
import tkinter.font as font

# Instantiates a TK object with a single button and calls the "pack" geometry manager.
root = Tk()
button = ttk.Button(root, text = "This button is crazy... but still does nothing")
button.pack()

# Creates a new style to apply to the button.
style = ttk.Style()
style.configure("Modified.TButton", background = "yellow", foreground = "blue", font = ('liberation serif', 24, 'italic'))

# Applies the style
button.config(style = "Modified.TButton")

root.mainloop()
But it might not always be a seamless experience. For example, if you are running this code block on a Mac, you will likely notice how the background color did not change to yellow as indicated by the code.

Since a GUI created with Tkinter (by default) integrates with the look and feel of your OS, it follows that how it will display will vary slightly depending on the OS that you choose. That can lead to unexpected results.
In the case of Mac OS X, the default Tkinter style is based on the “aqua” theme which prevented the background colors from displaying. The quickest fix would be setting the theme to one that does not override your choice of background colors.
# Imports the Tkinter libraries.
from tkinter import Tk, ttk

# Gets a list of available themes on your system.
print(style.theme_names())

# Switches to the classic theme.
style.theme_use('classic')
It may now be apparent why testing across devices is highly recommended. In addition to friction from themes, you will need to address the problem of varying display sizes and font availability across different systems.

Beyond the basics
The examples here just scratch the surface in what can be done in Tkinter. If you get stuck, there are many online resources for it that can help you on your way. You can also play with my code. The bells and whistles are minimal and it does the job while being self contained from the core module in a separate python file.
It can be intimidating at first, but the best thing to do is just dive in. The experience gained will make subsequent projects easier regardless of what GUI library you choose next.