
Tips for Getting CUDA Capabilities Integrated Into Your OCI/Docker Images on Linux
dockernvidiagpucuda
Love the simplicity of using Docker/Podman to store your machine learning environments, but need help integrating it with your NVIDIA GPU?
This guide will help get you up and running to integrate your containers with a single (local) GPU directly on a Linux workstation.
Note: It does not cover the steps needed to connect to multiple GPUs over a network, nor will it help users of Windows or Mac Os (The toolkit mentioned is incompatible with those operating systems).
What you will need
- The proprietary graphics driver installed on your host- This already would have been needed with or without containers. However, installing the additional CUDA libraries won’t be necessary as they will be built into your images.
- The NVIDIA Container Toolkit - The Linux packages here are compatible with both Docker and Podman.
- A CUDA enabled image - To properly integrate Docker/Podman with your GPU, it requires some tweaks to the environment inside the container along with the correct packages. Start with an official build to ensure that the first two steps are working properly.
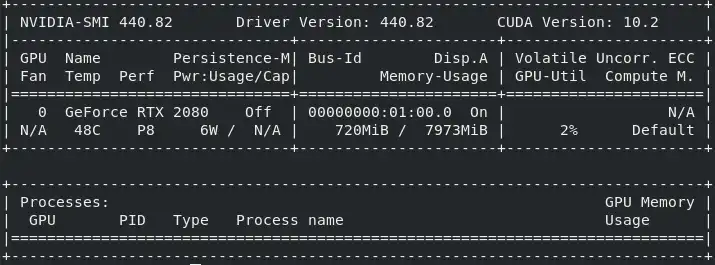
Assuming that everything is set up, a correct install will show an output similar to this in your terminal window when you call nvidia-smi from within your container.
Creating custom images
While NVIDIA’s website hosts a wide selection of machine learning images that will work out of the box once the toolkit is installed, you may want to create your own.
How you do that really depends on your use case, but you will want to put some thought into the structure/layering and avoid unnecessary duplication along the way.
Building on a parent image
If you see yourself necessitating GPU capabilities as the underpinning of all your work, you will want to set them as the base. There is an official repository on Docker Hub with an extensive list of tags where you can choose the Linux distro and CUDA version that you would like to build upon.
This will be the easiest way to create your own images and should (mostly) automatically avoid inadvertently creating endless copies of the CUDA dependencies which can roughly take up several gigabytes in each image.
Remixing the Dockerfiles
However if your GPU use case is an afterthought, you may want to manually add its integration later on as a branch of your downstream images.
Luckily you won’t have to recreate the wheel to do so since the build instructions are hosted on GitLab.
**Examining official images can be especially useful if you are new to Dockerfiles and need insight on how to better optimize them.**
Keep in mind that this level of customization comes with a few drawbacks:
- Since the packages in the Dockerfiles are continuing to evolve, you’ll need to monitor the repository more closely and tweak accordingly if you run into a snag when updating (which will be much more likely now).
- There may be a few unforeseen organizational complications in maintaining both CPU and GPU versions (i.e. duplication will be harder to avoid when building packages from source since you will need those GPU dependencies in earlier layers).
However, once a few libraries leverage the GPU, the speed boost coming from the custom containers that you’ve constructed will be well worth the effort.
If you’d like to see an example of the Dockerfile remixing that I discussed, I’ve recently forked the repository for the official Jupyter Notebook Docker images, adding in both commands and parenting images from the CUDA repository.